REAPER Routing
By Aaron Shippey | Mar 22, 2026
Today, I’m sharing a REAPER routing workflow I’ve developed that I’ve found to be highly effective.
First I’m going to color code all my tracks to help me keep track. Right-click the track, then go to Track color → Set tracks to custom color (Mac: you can also Ctrl+click if you’re using a trackpad). [insert colorCode.mov]
Bus Tracks
REAPER does not come with dedicated aux tracks. Any track can be audio, midi , or aux. To make an aux track. Just add the number of aux tracks you’ll need by clicking add tracks at the bottom of the TCP.
You can enable it by going to: reOptions → Themes → Theme Adjuster From there, navigate to Track controls from the main-menu panel on the left.
You’ll see a table with different track elements. Find the Route button column, then click the corresponding cell to disable the “hide” option. This will make the Route button visible on your tracks. [insert themeAdjustor.mov]
Add Track To Bus
Now that you’ve got your aux tracks, we’re ready to send the tracks to their dedicated bus. We can go to the route button in the TCP.
One thing I found frustrating about REAPER’s routing is that you can’t select multiple send tracks at once — you have to add them one by one via ‘Add new receive’.
A practical workaround I thought I’d invented (turns out I wasn’t first!): it’s often faster to click “Add all tracks” and then delete the ones you don’t actually want on that bus.
Side Chaining: Flexibility and control in REAPER
Sidechaining in REAPER can confuse users who are used to Pro Tools or other DAWs that handle routing automatically. In REAPER, each sidechain can have its own aux input, giving you more control and flexibility. To set up which aux input a track is sent to: Click Route on the bus or plugin track you want to send audio to.
Under Receives, find the track you want to send to this bus. Next to the track, you’ll see a box labeled 1/2 with an arrow pointing to the right. This represents the aux input channels the track is sending to. You can change this to 3/4, 5/6, etc. depending on which aux input you want the track to use.
In REAPER, you can assign as many aux inputs as you like, giving each track its own dedicated sidechain path if needed. This is more flexible than other DAWs but can initially feel confusing.
Routing Matrix: Signal Flow From a Distance
Finally, I am going to access the REAPER Routing Matrix to verify that the signal flow is working exactly as intended for this sidechain setup.
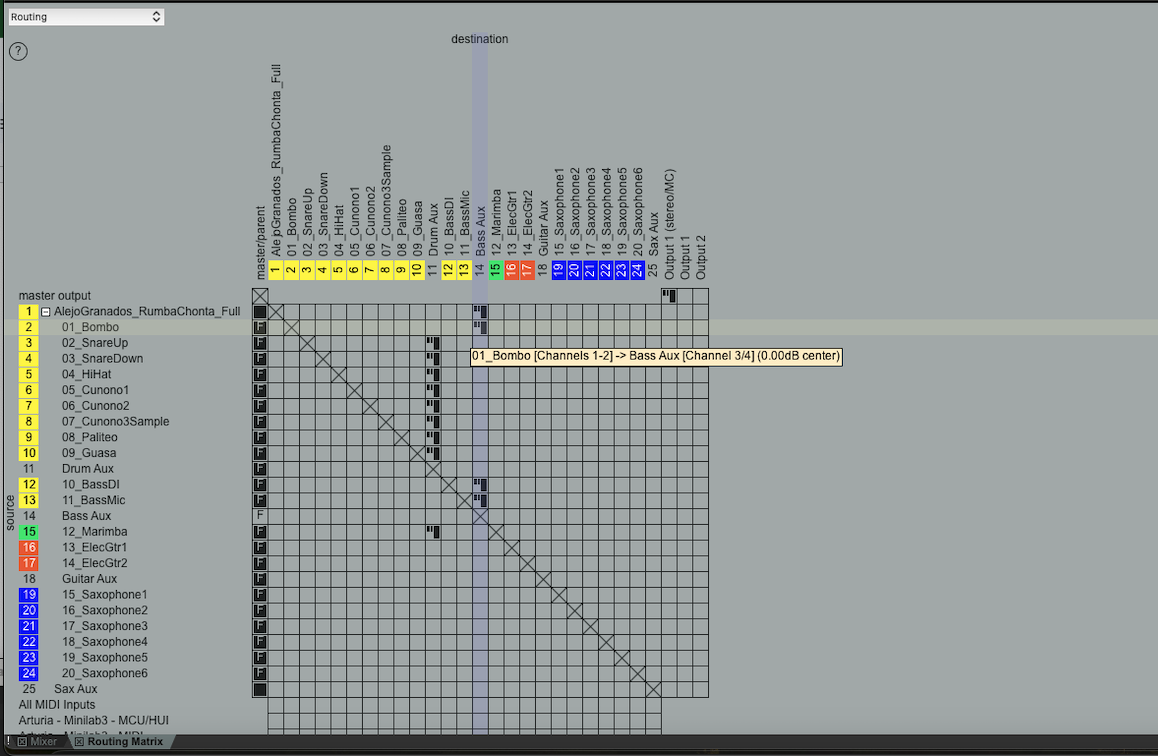
By hovering over the intersection of the 01_Bombo and Bass Aux tracks, I can confirm that the routing is technically sound: the audio from the kick is leaving its source on the standard Channels 1-2 and is being successfully received by the Bass Aux on Channels 3-4. This confirms that the dedicated Aux Input I created is active, allowing the kick to trigger the compressor without bleeding into the audible bass signal.
Final Thoughts
Routing in REAPER taught me a lot about the process of workflow and how each step helps you get to the end result.
If you’re an audio plugin company looking for plugin QA, I can help. Reach out at aaron@pluginproof.com.