Automation In REAPER: First Steps
By Aaron Shippey | Mar 18, 2026
Automation in REAPER can feel confusing at first, but it’s very flexible once you get the hang of it — here are some tips I picked up today.
Adding and removing automation lanes fast in REAPER
REAPER allows you to add many automation lanes at once.
First you’ll want to make sure to add your track.
Then, Just click Trim to open the automation window.
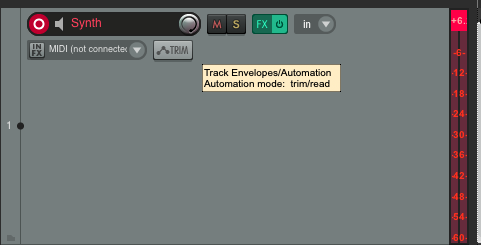
After you click ‘Trim’ you wil lsee the envelopes window open. You can select one parameter at a time or as many as you’d like all at once.
There, you can hold the shift key and select as many parameters as you want to enable them all at once. I find this especially helpful when working with plugins that have many parameters.
The same convenience applies when removing automation lanes. Instead of removing them individually—which can be time-consuming—you can open the Trim window, hold Shift, select the parameters you want to remove, right-click, and choose Hide All.
Improper Gain Staging: Clipping
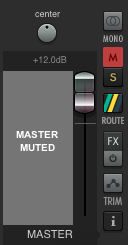
As I had the audio and midi for a couple of tracks I started working on automating. I suddenly noticed there was no sound coming from my speakers. When I checked REAPER, I saw that the master track had muted itself. This happened when the master gain was set to +12 dB. When I lowered it, the problem went away.
At first, I thought the issue might be related to the automation I was working with. I had several automation lanes open and was experimenting with filter cutoff modulation. But that didn’t really make sense.
Then I wondered if I had simply opened too many automation lanes on the guitar track. But that couldn’t be the problem either. Many projects have dozens or even hundreds of automation lanes across tracks, and my CPU usage was very low. So it wasn’t a performance issue.
Eventually I noticed that the master gain was set to +12 dB. When I lowered it to around +6 dB, the master track stopped muting itself. I did not properly manage gain staging by pushing the master gain to +12dB, which likely caused clipping during playback.
Watch out for Bypassing Parameter
I also ran into an unexpected issue while using Valhalla Supermassive. I opened the automation window, selected several parameters, and drew some automation. Then I wondered why I wasn’t hearing anything. I checked the FX window and saw that the plugin wasn’t enabled. When I tried to click the checkbox, it wouldn’t let me enable it. I then looked at the plugin window itself and noticed it said “Bypassed” at the top.
When I went back to the automation window, I realized there was a parameter controlling the plugin’s bypass state. Once I removed that automation, the plugin worked normally again.
Audio Routing Confusion
When I plugged in my headphones I couldn’t hear any audio coming through.
I checked my track settings, monitoring, and routing, and everything looked fine. It turned out the fix was straightforward: go to Options → Preferences → Audio → Device, and enable external headphones. Once I switched that on, the audio came through immediately.
Multitrack on BoomBox
I’ve attached the multi-track I developed during this project Check it out on Boombox
Final Thoughts
Today’s session reinforced just how powerful REAPER’s automation system can be — once you understand the shortcuts and workflow, you can work much faster and more efficiently. If you're a plugin dev or audio plugin company who needs an extra hand with QA, reach out to Aaron at aaron@pluginproof.com. Thanks for reading, and have a great day!
Comments